Step by step
Good practices for your best touchOSC experience
How do you want to use TouchOSC ?
No matter how, we will help you
Connection types:
Select and find out how to use touchOSC
What do you use?


Select and find out how to use touchOSC

TOUCHOSC android Wifi
Learn how to connect your Android device with touchOSC to your computer using a WIFI network
Step 1: Download TouchOSC Bridge v1.5.0 (at: hexler.net ) and install it on your computer;

Step 2: Connect your computer and device on the same WIFI network;
NOTE: You can create a wifi network from the Android device that has the TouchOSC open.
#dicasbydoug: if your device allows it, choose to disable mobile data after creating your Wifi network on Android, this will bring you better performance and confidence in the network created.
Step 3: Activate the TouchOSC Bridge on your computer, make sure that the touchOSC Bridge icon (B) appears on the top bar of your OSX, or on the bottom bar of your Windows;

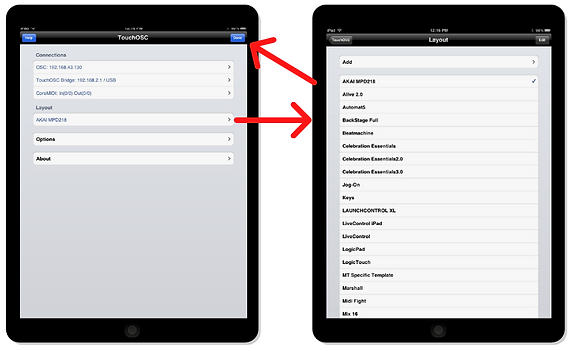
Step 4: Start TouchOSC on your device, go to the TouchOSC Bridge screen, if your computer name appears in the FOUND HOST list (1): select it.
If your computer does not appear on the FOUND HOST list (0): manually enter your computer's IP address.

Step 5: Choose your template in the Layout tab of touchOSC and click Done;

TOUCHOSC IOS Wifi
Learn how to connect your IOS device with touchOSC to your computer,
using a WIFI network

Step 1: Download TouchOSC Bridge v1.5.0 (at: hexler.net ) and install it on your computer;
Step 2: Connect your computer and device on the same WIFI network;
NOTE: You can create a wifi network from your own computer .
#dicabydoug: If you are using a Macbook or another computer with the OSX system, choose to create a network from your computer and connect your device to this network, this will bring you better performance and confidence in the created network.
Step 3: Activate the TouchOSC Bridge on your computer, make sure that the touchOSC Bridge icon (B) appears on the top bar of your OSX, or on the bottom bar of your Windows;

Step 4: Start TouchOSC on your device, go to the TouchOSC Bridge screen, if your computer name appears in the FOUND HOST list (1) : select it.
If your computer does not appear on the FOUND HOST list (0) : manually enter your computer's IP address

Step 5: Choose your template in the Layout tab of touchOSC and click Done ;

TOUCHOSC android USB
Learn how to connect your Android device with touchOSC to your computer using a USB cable
Step 1: Download TouchOSC Bridge v1.5.0 (at: hexler.net ) and install it on your computer;
Step 2: Enable the Router option on your Android device;
Step 3: Connect your Android device to your computer using the USB cable and enable Network routing via USB;
Step 6: Start TouchOSC on your device, go to the TouchOSC Bridge screen, if your computer name appears in the HOST list: select it.
If your computer does not appear on the HOST list: manually enter your computer's IP address
Step 4: Connect your computer to this network created via USB;


Step 7: Choose your template on the Layout tab of touchOSC and click Done;

Step 5: Activate the TouchOSC Bridge on your computer, make sure that the touchOSC Bridge icon (B) appears on the top bar of your OSX, or on the bottom bar of your Windows;


TOUCHOSC IOS USB
Learn how to connect your IOS device
touchOSC to your computer using a USB cable

Step 1: Download TouchOSC Bridge v1.5.0 (at: hexler.net ) and install it on your computer;
Step 2: Connect your iOS device to the computer using the USB cable;
Step 4: Choose your template in the Layout tab of touchOSC and click Done;
Step 3: Activate the TouchOSC Bridge on your computer, make sure that the touchOSC Bridge icon (B) appears on the top bar of your OSX, or on the bottom bar of your Windows;

TOUCHOSC
Learn how to connect your Android device with touchOSC to your computer using a bluetooth connection

ANDROID
BLUETOOTH
Step 1: Download TouchOSC Bridge v1.5.0 (at: hexler.net ) and install it on your computer;

Step 2: Enable the Router option on your Android device;
Step 3: Connect your Android device and computer using bluetooth pairing; Enable Network routing via Bluetooth on your device;


Step 4: Connect your computer to your device's bluetooth network;

Step 5: Activate the TouchOSC Bridge on your computer, make sure that the touchOSC Bridge icon (B) appears on the top bar of your OSX, or on the bottom bar of your Windows;

Step 6: Start TouchOSC on your device, go to the TouchOSC Bridge screen, if your computer name appears in the HOST list: select it.
If your computer does not appear on the HOST list: manually enter your computer's IP address

Step 7: Choose your template on the Layout tab of touchOSC and click Done;

TOUCHOSC > IOS > BLUETOOTH
Learn how to connect your IOS device with touchOSC to your computer using a bluetooth connection

Step 1: Download TouchOSC Bridge v1.5.0 (at: hexler.net ) and install it on your computer;
Step 2: Connect your device to the computer via Bluetooth pairing;


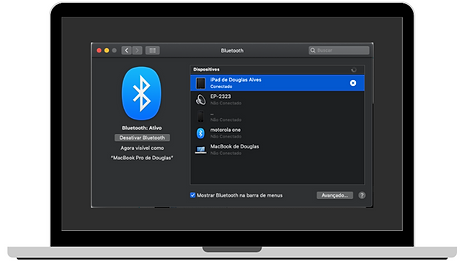

Step 3: Activate the TouchOSC Bridge on your computer, make sure that the touchOSC Bridge icon (B) appears on the top bar of your OSX, or on the bottom bar of your Windows;

Step 4: Start TouchOSC on your device, go to the TouchOSC Bridge screen, if your computer name appears in the FOUND HOST list (1) : select it.
If your computer does not appear on the FOUND HOST list (0) : manually enter your computer's IP address

Step 5: Choose your template in the Layout tab of touchOSC and click Done ;
TOUCHOSC + MAINSTAGE
Learn how to properly configure your Layouts on TouchOSC to control your MainStage concerts
Step 1: Connect to your computer using one of these ways: WIFI , USB or Bluetooth;
Step 2: Open your Mainstage concert and go to the Layout tab;
Step 3: Select the control you want to Map on MainStage and activate the ASSING option

Step 4: Move the corresponding control on the TouchOSC to perform the mapping;
Step 5: If you want this control to send commands from MainStage to TouchOSC: activate TouchOSC Bridge in Send Value to ;


TOUCHOSC + ABLETON
Learn how to properly configure your Layout in TouchOSC to control your Ableton project


Step 1: Connect to your computer using one of these ways: WIFI , USB or Bluetooth;
Step 2: Open your Ableton project, go to Ableton settings;
Step 3: Open your Ableton project, go to MIDI Ableton settings;
Step 4: In settings> MIDI> MIDI Ports: activate the touchOSC Bridge for Input and Output;


Step 5: Close the settings tab and click MIDI, select the control you want to map to Ableton;
Step 6: Move the corresponding control on the TouchOSC to perform the mapping;
Step 7: Repeat the action for all controls you want to map to Ableton, then disable the MIDI option;
Step 8: After making all the desired mappings, save your Ableton project with a name different from the original, and every time you use TouchOSC with Ableton, use this project already mapped to it;


TOUCHOSC + KONTAKT
Learn how to properly configure your Layout in TouchOSC to
control your Kontakt VST's

Step 1: Connect to your computer using one of these ways: WIFI , USB or Bluetooth;
Step 2: Open your Kontakt VST and go to Kontakt Settings;
Step 3: In the MIDI In tab, activate the TouchOSC Bridge for port A; In the MIDI Out tab, leave the TouchOSC Bridge ON
Step 4: Close the configuration tab and choose the control you want to map by clicking on it with the right button of your mouse;
Step 5: Choose the Learn MIDI CC # Automation option, then move the corresponding control on the touchOSC ;


Step 6: Repeat the action for all controls you want to map ;
Step 7: After making all the desired mappings, save your Kontakt VST with a different name than the original, and every time you use TouchOSC with Kontakt, use this VST already mapped to it;


